Scorch Torch Assembly Diagram- A Helpful Look
When thinking about tools that create a bit of heat, it's pretty common for people to wonder how they actually work. A scorch torch, as a tool, is something many folks might use for a range of tasks, perhaps even for things around the house or for hobbies. Knowing how a tool like this comes together can really make a difference in how you use it and how you look after it, you know? It's not just about turning it on; there's a whole system at play that makes the flame happen, and understanding that system can be quite useful for anyone who uses one, or even just thinks about using one.
There's a lot that goes into making a tool work well, and for something that produces a flame, like a scorch torch, knowing the bits and pieces is rather important. A diagram showing how it all fits together can be a really helpful thing to have. It's almost like a map for your tool, helping you see where everything belongs and how the different parts connect up to each other. This kind of visual aid helps quite a bit if you're trying to figure out what's what, or if you're just curious about the workings of such a device, in a way.
So, if you've ever found yourself curious about the insides of a scorch torch, or perhaps you're just looking to get a clearer picture of how these tools are put together, then a detailed drawing of its parts can be just what you need. It helps to clear up any questions about what goes where, and it gives you a much better feel for the whole item. We'll be looking at what these diagrams show us, and why they matter, just a little.
- What Is Coryxkenshin Favorite Color
- Perdon Por Molestarte Con Mi Amistad
- Gary Brecka On High Blood Pressure
- What Does Sad
- Gay Men In Diapers
Table of Contents
- What Does "Scorch" Really Mean for a Torch?
- Getting Familiar with Your Scorch Torch Assembly Diagram
- What Components Are Shown in a Typical Scorch Torch Assembly Diagram?
- Thinking About Safety with Your Scorch Torch Assembly Diagram
- How Can a Scorch Torch Assembly Diagram Guide You?
- Understanding the Scorch Torch Assembly Diagram for Troubleshooting
- Taking Care of Your Tool- Using a Scorch Torch Assembly Diagram
- Where to Find a Good Scorch Torch Assembly Diagram
What Does "Scorch" Really Mean for a Torch?
Well, when we talk about the word "scorch" itself, it generally refers to burning a surface just enough to change its color or how it feels, you know? It's not about setting something completely on fire, but more about leaving a mark, a slight burn. For instance, if you leave a piece of toast in the toaster for a bit too long, it might get a little bit scorched. That's the kind of effect we're talking about here. This idea of changing something's surface with heat is what these torches are designed to do, pretty much.
The word "scorch" can show up in all sorts of places, actually. You might hear it used to describe a very hot day, where the sun seems to scorch the ground. Or, as a matter of fact, you might even come across it in the name of something like "Scorch Radio 101.1 FM" in Port of Spain, which plays music and has a schedule, you know, it's just a name for a station you can listen to online. But when we talk about a "scorch torch," we're specifically thinking about a tool that helps you create that kind of surface change, often in a controlled way, which is really what it's for.
So, a scorch torch is a tool that lets you apply heat in a focused way to get that specific "scorched" effect. It’s not just about making a big flame; it's about the ability to control that heat to alter a surface, whether it's for cooking, for crafts, or for some other purpose. Knowing this helps set the stage for why understanding its parts, through a scorch torch assembly diagram, is so helpful, you see.
- What Does Fl Mean In Relationship
- Potatoes In A Basket
- Funny Marco Sister Ashley
- I Will Become The Perfect Mother For My Son
- Little Brunette Baddie
Getting Familiar with Your Scorch Torch Assembly Diagram
Getting to know your scorch torch better often starts with a look at its assembly diagram. This kind of drawing breaks down the whole tool into its individual pieces, showing you how they all connect. It's like looking at a blueprint for your device. This can be really useful for a few reasons. For one, it helps you see the various components that make up the torch, from the fuel tank to the nozzle, and everything in between. It gives you a visual explanation of how it's all put together, which is quite handy, in a way.
When you have a scorch torch assembly diagram in front of you, you can easily identify each part by its shape and where it sits in relation to the others. This can be a big help if you ever need to do some basic upkeep or if you're trying to figure out how a certain part works. It simplifies what might seem like a complicated piece of equipment into a series of smaller, more manageable sections. It's about making the tool less of a mystery and more of an open book, so to speak, you know?
Having a clear visual representation of the torch's inner workings means you can approach any task involving the tool with a bit more confidence. It takes away some of the guesswork that might come with trying to understand a new piece of equipment. It's just a good way to get a solid grasp on the mechanics of your scorch torch, which can be pretty reassuring, actually.
What Components Are Shown in a Typical Scorch Torch Assembly Diagram?
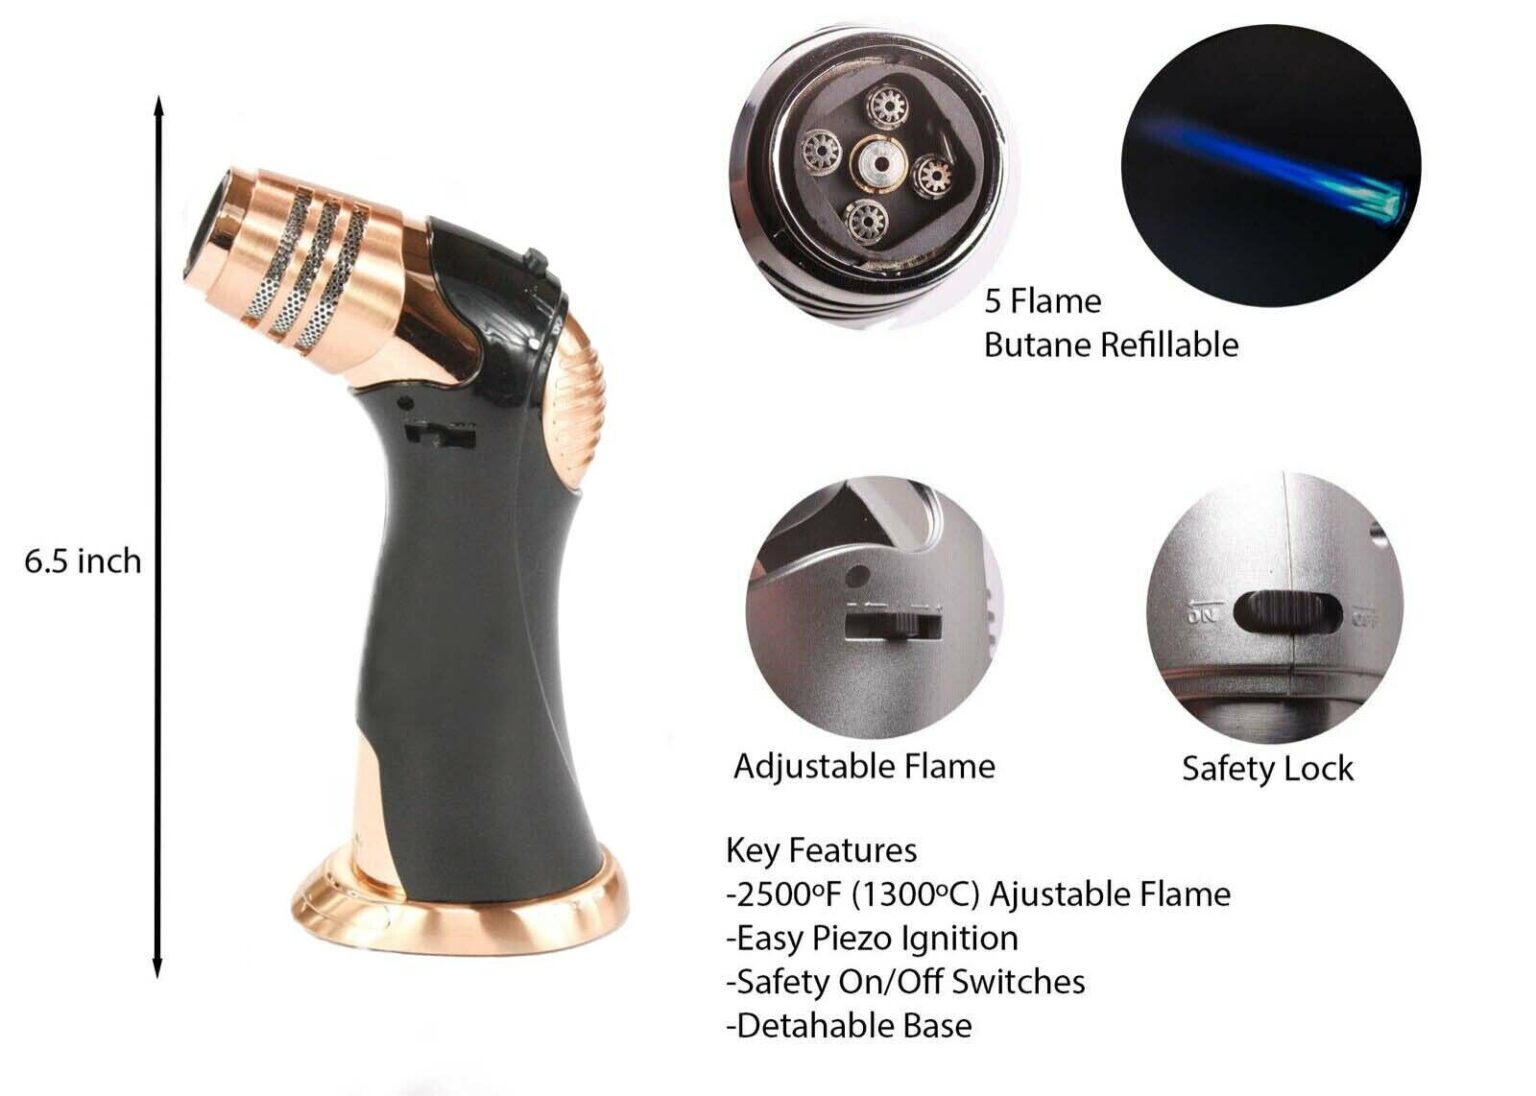
When you look at a scorch torch assembly diagram, you'll typically see a range of parts laid out, each with its own role in making the torch work. You'll probably spot the fuel container, which holds the gas that powers the flame. Then there's usually a valve or a control knob that lets you adjust how much gas flows out, which is pretty important for managing the flame's size and heat. These diagrams often show the igniter too, the part that creates the spark to light the gas, as a matter of fact.
Beyond those, a scorch torch assembly diagram will likely point out the burner tube or nozzle, which is where the flame actually comes out. There might be seals or gaskets shown as well, which are little rings that help prevent gas from leaking out, keeping everything safe and sound. Sometimes, there are also handles or grips, showing how the user holds the tool comfortably and securely. It’s a complete picture of all the bits and pieces, really.
Each of these elements plays a specific part in the torch's operation. Seeing them all separated and labeled in a scorch torch assembly diagram helps you understand the flow of gas, how it's ignited, and how the flame is formed. It breaks down the whole process into easy-to-see steps, making the overall function of the torch much clearer. This visual aid is quite helpful for anyone wanting to get a better feel for their tool, you know?
Thinking About Safety with Your Scorch Torch Assembly Diagram
When you're looking at a scorch torch assembly diagram, it's a really good opportunity to think about safety. Understanding how the parts fit together can help you spot potential issues before they become problems. For instance, if you see where the fuel line connects, you can pay extra attention to that area when you're using the torch to make sure there are no loose fittings or signs of wear. This kind of careful observation is pretty important, you know.
A scorch torch assembly diagram often highlights areas where gas flows or where heat is generated. This visual information can guide you on where to be most careful when handling the tool. It might show you where to check for leaks, or where to avoid touching when the torch is in use. It's like having a map that also points out all the places you need to be extra cautious, which is really useful for staying safe, basically.
By studying the scorch torch assembly diagram, you can get a better sense of the tool's design for safety. You might notice features like a stable base or a heat shield, and understanding their purpose helps you use the torch as it was intended. It encourages a more responsible approach to using a tool that deals with open flame, and that's something everyone should consider, in a way.
How Can a Scorch Torch Assembly Diagram Guide You?
A scorch torch assembly diagram can guide you in quite a few ways, making your experience with the tool much smoother. For starters, if you're ever putting a new torch together, or perhaps reassembling one after cleaning, the diagram acts like a step-by-step guide. It shows you the order in which parts should be connected and how they should sit, which takes away a lot of the guesswork. It's like having instructions without all the words, just pictures, you know?
Beyond initial setup, a scorch torch assembly diagram is also incredibly helpful for general upkeep. When it's time to clean or replace a part, the diagram helps you identify exactly which piece you need to work on. It prevents you from accidentally taking apart the wrong section or missing a small but important component. It helps you be precise in your actions, which is really quite good for keeping your tool in working order, as a matter of fact.
Moreover, if you're trying to understand why your torch might not be working as it should, the scorch torch assembly diagram can give you clues. You can trace the path of the fuel or the flow of air to see where a blockage or a loose connection might be. It gives you a visual reference point for troubleshooting, making it easier to pinpoint issues. It's a bit like having an X-ray view of your torch, which is very useful for problem-solving, you see.
Understanding the Scorch Torch Assembly Diagram for Troubleshooting
When something isn't quite right with your scorch torch, the assembly diagram can become your best friend for figuring things out. Let's say the flame isn't as strong as it should be. By looking at the scorch torch assembly diagram, you can trace the fuel line from the tank to the nozzle. This might help you see if there's a filter that could be clogged, or a connection that seems loose. It helps you narrow down the possibilities, which can save you a lot of time and frustration, too it's almost.
If the torch isn't lighting at all, the scorch torch assembly diagram can direct your attention to the igniter mechanism. You can see how the spark is supposed to be generated and where it meets the gas. This allows you to check those specific parts for any obvious damage or misalignment. It provides a clear visual path for diagnosing the problem, rather than just guessing, you know?
Sometimes, a scorch torch assembly diagram will even include common trouble spots or points where wear and tear are most likely to occur. This kind of information, combined with the visual breakdown of parts, makes it much simpler to figure out what's going on and how to fix it. It's a really practical tool for keeping your torch in good working order, basically.
Taking Care of Your Tool- Using a Scorch Torch Assembly Diagram
Keeping your scorch torch in good shape means giving it a little care now and then, and a scorch torch assembly diagram can really help with that. Knowing where all the parts are and how they connect makes it easier to clean the right areas. For example, you might need to clear out the nozzle occasionally, and the diagram shows you exactly where that part is located and how it might be accessed. It just makes maintenance much more straightforward, you know.
The scorch torch assembly diagram can also show you which parts might need replacing over time, like seals or O-rings that can wear out. By seeing them clearly in the diagram, you can identify them and know what to ask for if you need to buy replacements. This helps extend the life of your tool and keeps it working safely and effectively. It’s about being proactive with your tool's health, in a way.
Proper storage is also something to consider, and while a scorch torch assembly diagram doesn't directly show storage, understanding the tool's structure helps you store it properly. Knowing which parts are delicate or which areas need protection can guide you in putting it away safely. It's all about having a full picture of your tool, which ultimately leads to better care and a longer lifespan for your scorch torch, which is very helpful, you see.
Where to Find a Good Scorch Torch Assembly Diagram
Finding a reliable scorch torch assembly diagram is usually not too hard, but knowing where to look helps. Often, the best place to start is with the torch's manufacturer. Their official website or the manual that came with your torch will typically have a detailed diagram. These are generally the most accurate and complete, as they come straight from the people who made the tool. It's the primary source for this kind of information, you know.
If you don't have the original manual, or if you're looking for diagrams for an older model, a quick search online can often yield good results. Many online retailers or forums dedicated to tools and DIY projects might have diagrams shared by other users. Just be sure to cross-reference with a few sources if you're not getting it directly from the manufacturer, just to be sure you have the right one for your specific scorch torch assembly diagram.
Sometimes, local hardware stores or tool repair shops might also have access to these diagrams, or they can point you in the right direction. They deal with these tools all the time, so they often have resources or experience that can be very helpful. It's about finding a source that you trust to give you accurate information for your scorch torch assembly diagram, which is pretty important for any kind of repair or maintenance, as a matter of fact.
So, we've taken a look at what a scorch torch assembly diagram is all about. We covered the meaning of the word "scorch" and how it relates to the tool, then explored why having such a diagram is helpful for getting familiar with your torch. We discussed the typical components you'd see in one of these diagrams and considered the importance of safety when reviewing it. We also touched on how a scorch torch assembly diagram can guide you through putting things together, fixing problems, and taking good care of your tool. Finally, we looked at some places where you might find a reliable scorch torch assembly diagram for your own use.


Detail Author:
- Name : Mr. Justice Wilkinson
- Username : ewiza
- Email : enos96@gmail.com
- Birthdate : 1994-10-05
- Address : 66107 Neoma Hill Suite 939 Griffinchester, NY 79567-3133
- Phone : +1-850-407-3159
- Company : Dickens-Brown
- Job : Computer Scientist
- Bio : Earum perspiciatis sapiente eos tenetur rerum autem esse. Repellat ex enim recusandae soluta. Placeat rerum ipsum omnis illo nihil.
Socials
instagram:
- url : https://instagram.com/trevor_official
- username : trevor_official
- bio : Voluptates similique iusto tenetur dolor assumenda. Consequatur ex voluptatum sit.
- followers : 506
- following : 794
facebook:
- url : https://facebook.com/casper1984
- username : casper1984
- bio : Maiores eveniet ut laudantium.
- followers : 202
- following : 2946
tiktok:
- url : https://tiktok.com/@trevor.casper
- username : trevor.casper
- bio : Aspernatur aut optio ullam. Hic exercitationem minima ipsum nihil eos et.
- followers : 1735
- following : 1239
